Create a Harvest Query
From the Harvester > Query tab, you can harvest using either a:
- Search query (default), or
- List of URLs.
You can also:
Quick Summary
To harvest from the internet:
-
You can either:
-
create a new query: Search Query or URL List

-
-
Select the Select a Collection to save the results.
-
Select
 Harvest.
Result: The Harvest Jobs tab is displayed showing the progress of the harvest job. See View Harvest Jobs.
Load a Previous Query
You can quickly load previously used queries from the:
-
Saved tab, select the
 Open Query button for the query you want to open.
 -
Batch tab, select the
 Edit button to view the scheduled queries and select the Open Query button.
 -
Harvest Jobs tab, in the Query Input column, select the
 Open this search facet button.
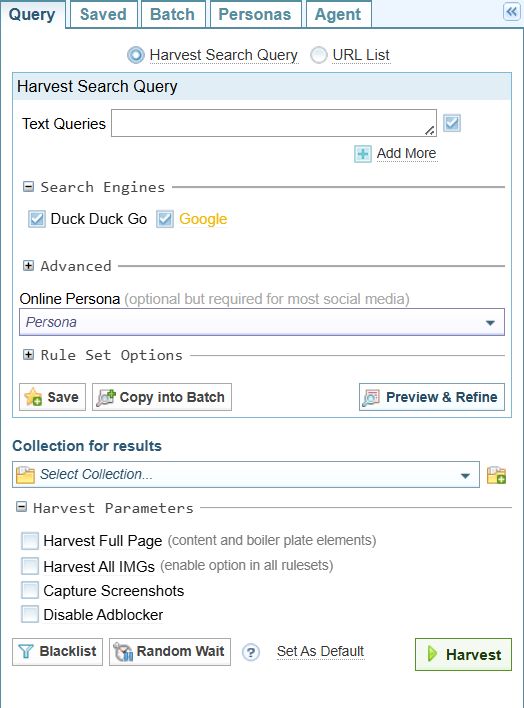
Search Query
Enter the terms or phrase you want to search for in the Text Queries field.

Options:
 Add More Add More |
Add more text query fields. |
|
|
Click and drag the bottom right corner to make the text query field larger. |
|
|
When you have more than more than one text query, you can select or unselect the queries to include in the search. |

|
Remove the text query field (only visible when more when one text field is displayed) |

Choose Search Engines
Select the search engines to use:

Search Engines
Harvester has two preconfigured search engines:
- Google, and
- Duck Duck Go
You can add more search engines by creating new rule sets. See Create a Rule Set: Sintelix Extension. When additional search engine rule sets have been defined, they will shown as options in the  Search Engines section.
Search Parameters (optional)
Expand the  Advanced section to view and modify the search parameters for each selected search engine.
Search parameters
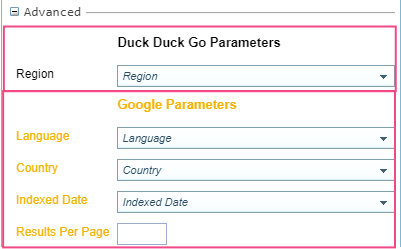
The search parameters can be unique to each search engine. They are defined in the Rule Set configuration for the search engine, including the colour of the text. See Search Engine Driver.
Ignore URLs: This query only (optional)
You can identify URLs to exclude from the search results for this query by listing them in the Ignore URLs field.

You can add URLs:
-
manually by copying and pasting URLs into the field, or
-
automatically by:
-
selecting
 Preview & Refine to view the search results.
 -
unselecting any unwanted URLs.
Result: Unselected URLs are added to the Ignore URLs field automatically.
-
You can also create a Blacklist to exclude URLs for all queries run in the whole project. Allows the use of wildcards. See Blacklist: Project-wide (optional).
URL List
To harvest from a list of URLs, select the  URL List option.
You can either:
-
copy and paste URLs into the field, or
-
select the
Add... to load URLs saved using the Sintelix Extension button. The
Add... option is only displayed if URLs have been saved.See Add URL to Store.
-
load a saved query from the Saved tab by selecting the
Open Query button for the query you want to open.
The example below lists five news sites about the 2024 presidential election.
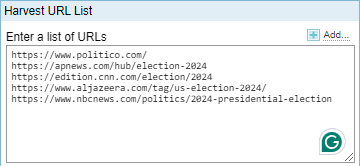
-
Each URL is on a separate line.
-
Invalid URLs will be ignored.
Query Options
Select Persona (optional)
You need a Persona to harvest content from sites that require login credentials, such as social media sites.
Select the Persona from the dropdown list, if required.
To create or update Personas, see Manage Personas.
Rule Set Options (optional)
By default, all the Harvester Rule Sets configured for the project are enabled.
Expand the Rule Set Options section to view a list of all Rule Sets.
You can:
-
disable all or enable all by selecting the checkbox at the top of the Rule Set list (this can be useful when you only want to have one Rule Set enabled).
-
individually disable or enable a Rule Set by selecting the checkbox next to the Rule Set name.
-
modify the depth (the number links followed from page to next page before stopping) - the higher the depth number, the more pages will be harvested. See Concept: Harvest Depth. The Rule Set default is displayed, which you can override by typing a number in the field.
Search Engine Rule Sets are only shown in the Search Engines section.
Save Query (optional)
Select  Save to save the Query so it can be easily used again in the future.
Result: The query is saved and listed under the Saved tab.
Copy into Batch (optional)
Select the  Copy into Batch to copy the query into a new scheduled harvest or add to an existing scheduled harvest.
Result: The query is saved and listed under the Batch tab.
See Schedule a Harvest.
Preview & Refine (optional)
Select the Preview & Refine button to see the query results without harvesting the content.
Result: The query results are displayed in the Preview & Refine tab.
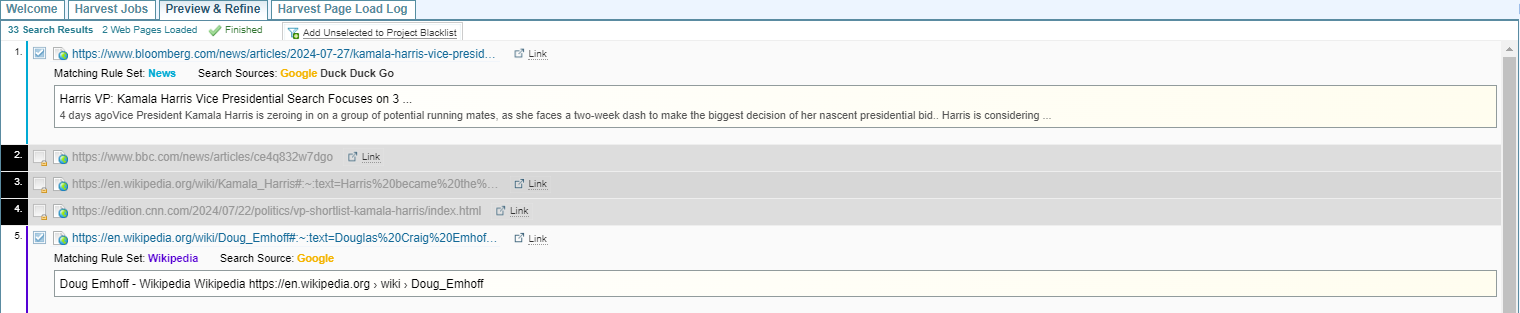
The results displayed in the Preview & Refine tab will expire after 8 hours.
Any results that have been ignored because the URL is blacklisted will be greyed out and marked with black numbers.
Actions
From the Preview & Refine tab, you can add URLs to ignore from the results for:
-
this query only, by unselecting the checkbox next to the results. As each result is unselected, the URL is added to the Ignore URLs field (see Ignore URLs: This query only (optional)).
-
all queries for this Project by unselecting the checkbox next to the results and then selecting
 Add Unselected to Project Blacklist.
 Result: The unselected URLs are added to the Blacklist and the results are greyed out with black numbers.
You view and modify the Blacklist by selecting the button. In the Blacklist dialog, you can edit the URLs using wildcards to make them more generic. See Blacklist: Project-wide (optional).
Select a Collection
Select the Collect to store the results.

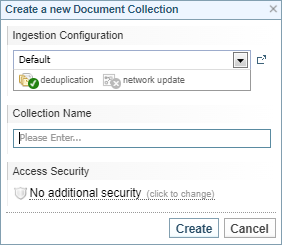
Create a New Collection
To create a new Collection:
-
Select the Add Collection
 button.
Result: The Create a new Document Collection dialog is displayed.
-
Select the Ingestion Configuration to apply to the Collection.
-
Enter a name for the Collection.
-
Apply security for the Collection, if required.
-
Select .
Result: The Collection is created and selected in the Collection for results dropdown.
Harvest Options
Harvest Parameters
Enable the required harvest options:
-
Harvest Full Page (content and boiler plate elements) - this is useful when you are testing Rule Sets or setting up a Gold Standard Collection.
-
Harvest All IMGs - this will harvest all images within the elements being harvested within all Harvester Rule Sets. Images in elements not being harvested will still be excluded.
-
Capture Screenshots - Creates the screenshots of the websites that are harvested. This is useful if need to keep a record of the page at the time it was harvested as evidence.
-
Disable Adblocker - Disables the installed adblock capability, which can help the harvest run faster but may capture ads within the harvested content, depending on the ruleset settings applied.
Blacklist: Project-wide (optional)
You can create a list of URLs to exclude from all harvest jobs in the project.
You can also create a list of URLs to exclude for just this query. See Ignore URLs: This query only (optional).
View/Modify the Blacklist
You view and modify the Blacklist: Project-wide (optional) by selecting the button.
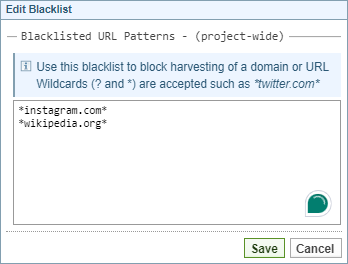
Add URLs to the Blacklist
You can enter URLs:
-
manually by copying and pasting URLs into the blacklist, or
-
automatically by:
-
selecting
Preview & Refine to view the search results, and -
unselecting any unwanted URLS
-
selecting
Add Unselected to Project Blacklist. Result: The unselected URLs are added to the Blacklist and the results in the Preview & Refine tab are greyed out with black numbers.
-
Random Wait (optional)
Setting a Random Wait time adds a delay between the page requests to the same domain.
Why add a Random Wait time
Many websites have measures to detect and block web scraping activities, such as measuring the frequency of requests from a single IP address, which could result in an IP address being temporarily or permanently blocked. Random Wait times can mimic human behaviour and potentially avoid detection.
Random Wait Time In Harvester Configuration
A default Random Wait time is set in the Harvester Configuration and can be modified by the Administrator. Setting a Random Wait time using this feature will override the Admin Harvester Configuration settings .
Set a Random Wait Time
To set a Random Wait Time:
-
Select
 Random Wait.
Result: The Random Wait Time dialog is displayed.
-
Enter the domains.
-
Set the wait time delay in seconds range.
-
To add a separate group of domains, select
Add New Group. -
To remove a separate group of domains, select
Delete. -
Select .
Set as Default
Set as Default saves the following settings for your current project:
- Search Engine selections and parameters
- Ruleset Options
- Collection
- Harvest Parameters
This default is applied when you access Harvester.
The default is required for the Harvest Now feature available from the Documents Pane and View the Node Table.