Data Definition
Once you have selected a Source Type and uploaded a sample file or connected to a Database you need to complete the Data Definition tab.
When you have completed the required fields, select to continue. Select the button to save your progress at any time.
Purpose
The Data Definition tab determines how the data contained in the Sample File is read as fields.
The options displayed depends on the Source type selected.
Process
You need to:
-
complete the options displayed for the Source Type:
-
JSON Data Preview in the Sample Data section, and
-
Edit Field Names, if required.
Excel
When the Source Type is Excel, the following fields are shown:
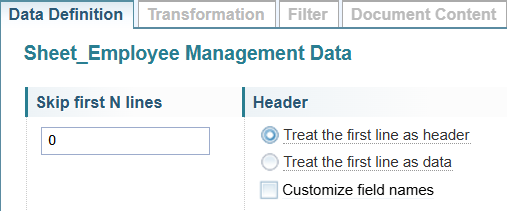
Skip first N lines
Files exported from software may include unwanted text at the beginning of the file.
You can specify the number of lines to ignore before reading the data.
For example, if you enter 2, the first 2 lines/rows will be ignored.
Header
Select the required Header option.
-
Select Treat the first line as header to use the text in the first line of the sample data will be used as the Field Names.
-
Select Treat the first line as data if the sample data does not have headers. You will need to edit the Field Names to give each column a field name.
To edit the Field Names, select the Customize field names checkbox. See Edit Field Names for more information about editing the field names.
Delimited
When the Source Type is Delimited, the following fields are displayed:
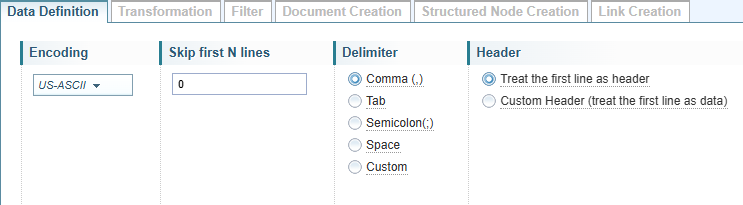
Encoding
Select the required encoding option from the dropdown.
Encoding identifies the character set to apply to the text being imported. This can be vary depending on the language and the operating system. If in doubt, accept the default option.
Skip first N lines
Files exported from software may include unwanted text at the beginning of the file.
You can specify the number of lines to ignore before reading the data.
For example, if you enter 2, the first 2 lines/rows will be ignored.
Delimiter
The Delimiter option is unique to the Delimiter source type.
Choose the character that separates the field values in the file.
The most common option is comma, used in comma separated values (CSV) files, but other characters maybe used..
Header
Select the required Header option.
-
Select Treat the first line as header to use the text in the first line of the sample data will be used as the Field Names.
-
Select Treat the first line as data if the sample data does not have headers. You will need to edit the Field Names to give each column a field name.
To edit the Field Names, select the Customize field names checkbox. See Edit Field Names for more information about editing the field names.
Fixed Width
When the Source Type is Fixed Width, the following fields are displayed:

Encoding
Select the required encoding option from the dropdown.
Encoding identifies the character set to apply to the text being imported. This can be vary depending on the language and the operating system. If in doubt, accept the default option.
Skip first N lines
Files exported from software may include unwanted text at the beginning of the file.
You can specify the number of lines to ignore before reading the data.
For example, if you enter 2, the first 2 lines/rows will be ignored.
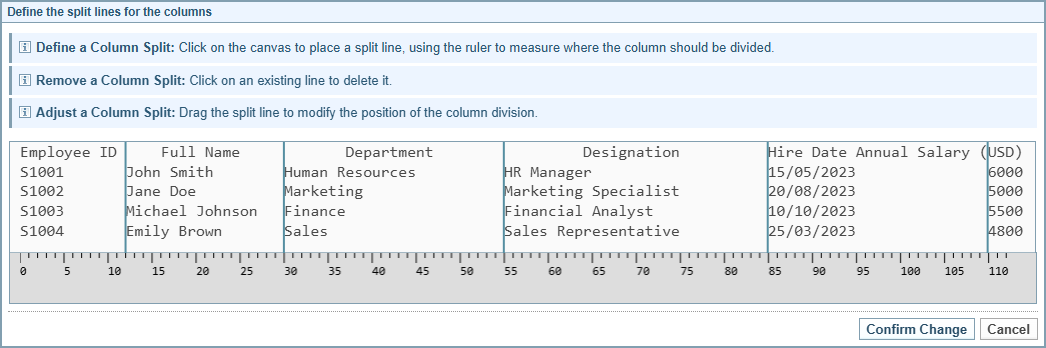
Define Columns
The Define Columns option is unique to the Fixed Width source type.
Select the button to identify and mark the boundaries of the fields within the file.
The following dialog is displayed:
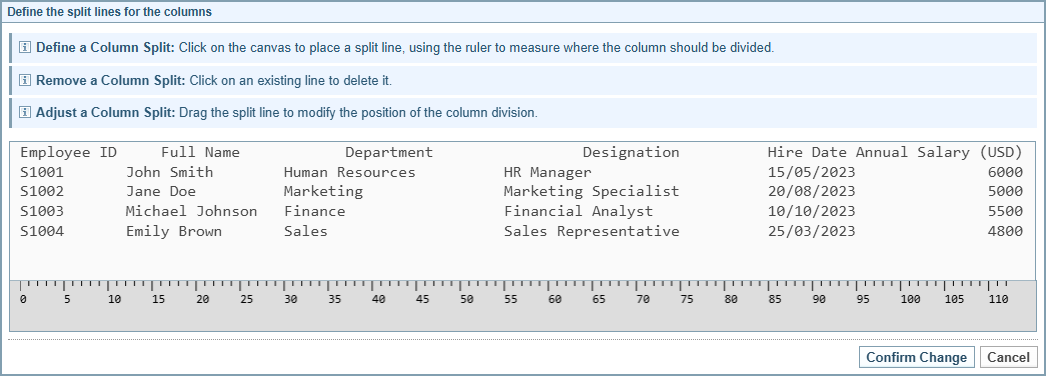
Click where you want the column boundary to be.
The example below shows the column boundaries for each of the fields.
Header
Select the required Header option.
-
Select Treat the first line as header to use the text in the first line of the sample data will be used as the Field Names.
-
Select Treat the first line as data if the sample data does not have headers. You will need to edit the Field Names to give each column a field name.
To edit the Field Names, select the Customize field names checkbox. See Edit Field Names for more information about editing the field names.
JSON
When the Source Type is JSON, the following fields are displayed in the data definition tab:

Generate schema
The Generate schema option is unique to the JSON source type.
The structure of a JSON file can be variable, and you may need a significant sample file source to capture all the possible variations in order to view the complete file schema.
Select the number of records to use from the sample JSON file to use to generate the file schema.
Tip: For a JSON file with a complex structure with many variable field options, it is recommended to include at least one record in the sample file that captures all schema variations.
JSON Data Preview
The Sample Data section for JSON is slightly different to the other source types due to the variable structure possible within a JSON file.
The sample data will display the first record found in the Sample Data file. You can select a different record using the Display the record at position dropdown.
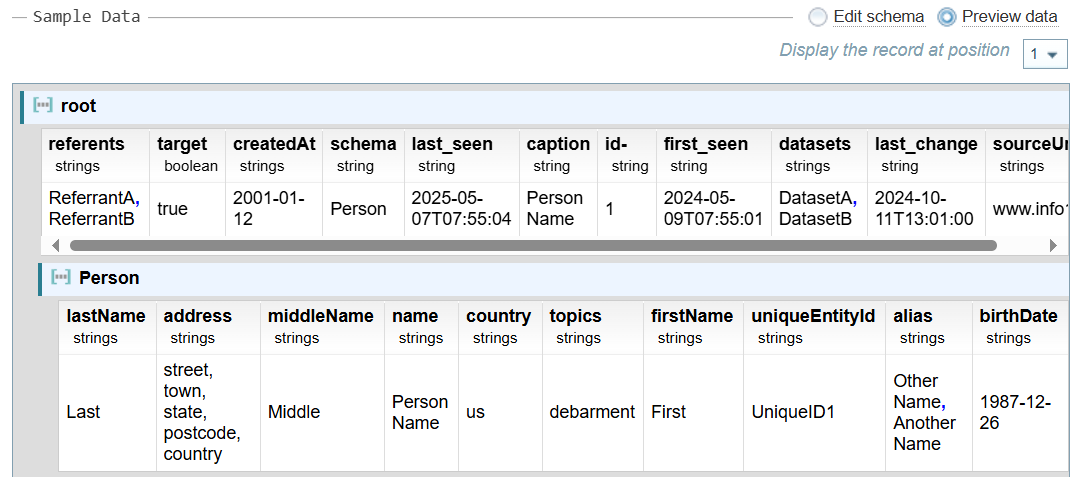
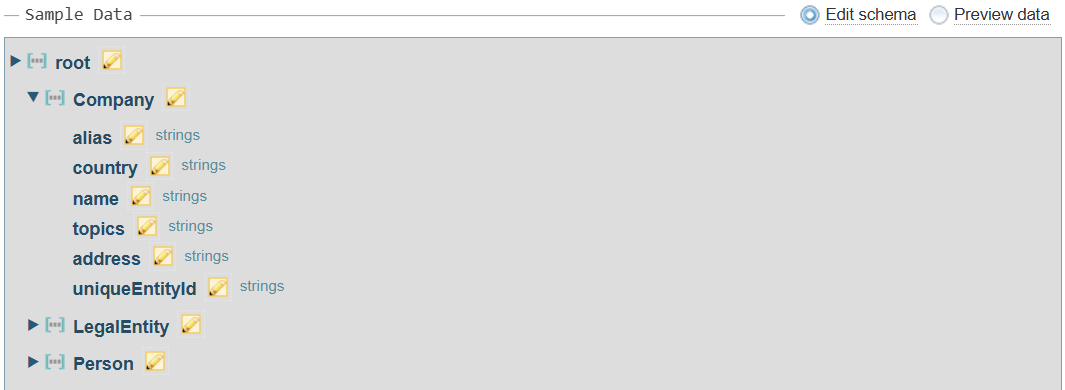
JSON Schema Preview
Select Edit schema option to view the structure of the JSON file generated from the number of records selected in the Generate schema option.
You can expand and collapse the tree structure, as required.
Select the  Edit button to modify field names.
JSON Reference Object
There is one additional field that is shown when working through the Load Structure Import configuration wizard for a JSON source file, called a Reference Object.
Rationale
JSON files can have a complex structure, where a single record can have a arrays of objects within a single record, each with field values.
Every JSON record has a <root>, which can contain a branching structured of fields and objects.
Therefore, when choosing fields in the following tabs, for example, transformations, you need to identify the Reference Object, so Sintelix knows which field to relate the action to.
This is important when dealing with arrays of objects.
Reference Object
Sintelix needs to know whether to reference each Object in the array separately or collectively.
If you select the Reference Object as the:
-
root, each object in the array will be treated collectively. For example:
-
A, B, C
-
-
array object, each object in the array will be treated separately. For example:
-
A
-
B
-
C
-
Example Data
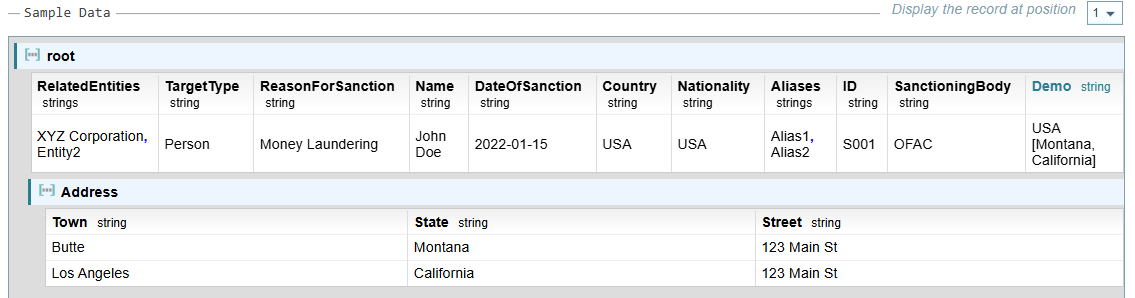
The diagram below represents an example JSON file structure.
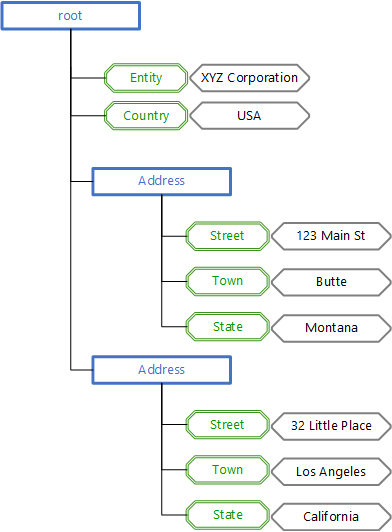
This is displayed in the Sample Data using the following format.
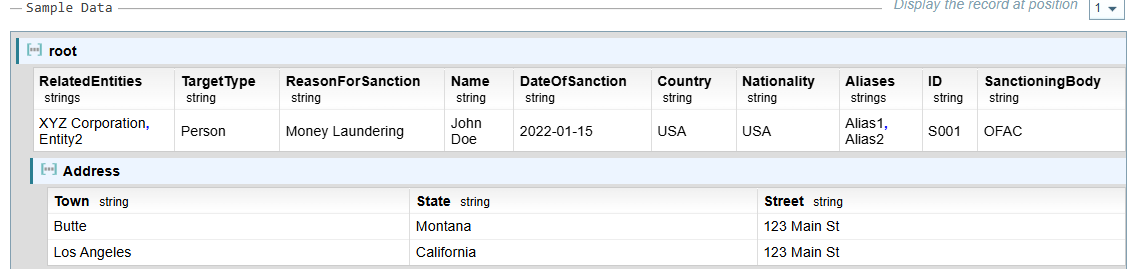
Example: Root as Reference Object
Below is a format transformation used to combine two fields, one from the root and one from the Address, using the Root as the Reference Object.
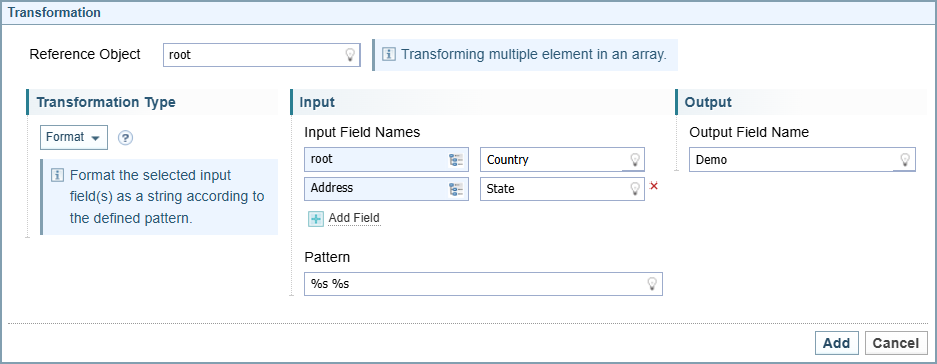
The resulting Demo field is added to the root, giving one output field that combines the values from the two address objects, as shown below:
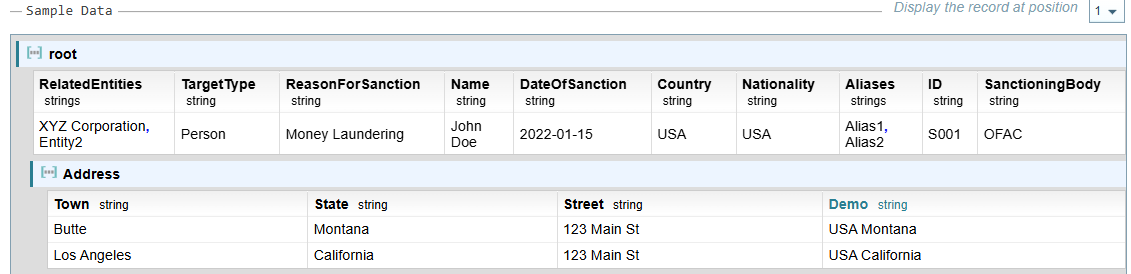
Example: Object as Reference Object
The results vary from the example above when we use the Address object as the Reference Object.
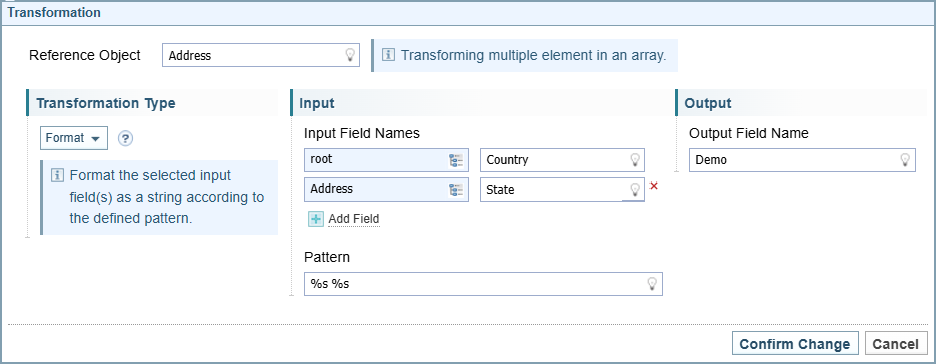
The resulting Demo field is added to the Address Object, giving two output fields, as shown below:
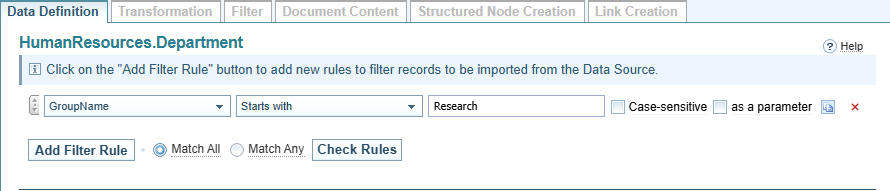
Database
When the Source Type is Database, you have the option to add pre-load filters when a Table container is selected.
While you can filter data under the filter tab, this is done once the data has been loaded into Sintelix.
When you have a database with a significant number of records, it can be useful to filter the data before it is loaded into Sintelix.
When the container has been created from a Custom Query, you will see a summary of the query. You can not add a pre-load filter to a Custom Query.
Add a pre-load Filter
To add a pre-load filter:
-
Select
Result: a new filter rule is added.
-
When you have more than one rule, choose between:
-
Match All, where data needs to meet the criteria of all the rules listed, or
-
Match Any, where data only needs to meet the criteria of one of the rules listed.
-
-
Define the filter rule.

Click and drag to change the order of the rules. Select attribute... Select the field you want to filter on Select criteria... Select the criteria you want to apply to the rule <value> Enter the value you want to filter on Case-sensitive Check if the filter is case sensitive as a parameter Check if you want the user to enter the value at the time of loading the file.
If this is checked, the value entered in the value field is used to preview the results in the Sample Data section.

Duplicates a rule. 
Removes a rule. -
When finished, select to confirm there are no missing elements.
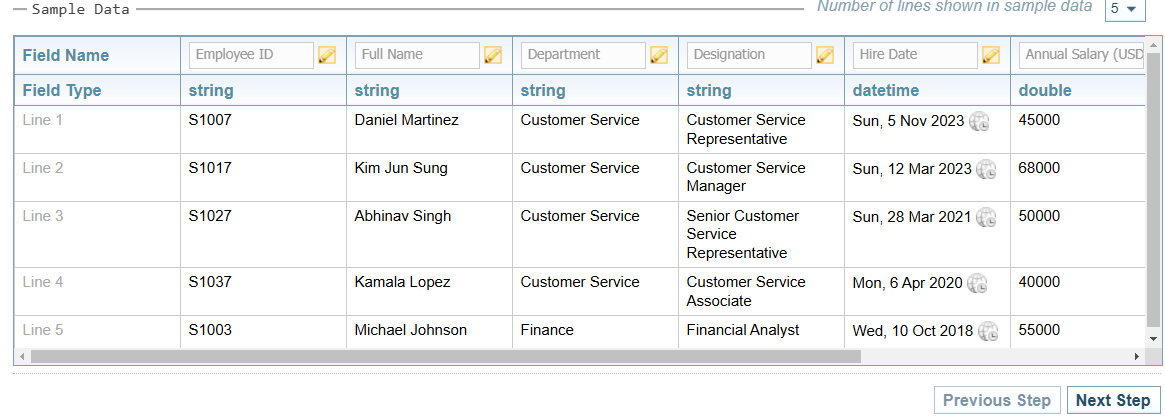
Sample Data: Preview the Results
Preview the Results
The Sample Data section is displayed at the bottom of each tab so you can preview the effect of your configuration settings.
The sample data displays the first 5 rows of the data contained in the Sample Data file.
The JSON Sample Data varies slightly from the sample data for Excel, Fixed Width and Delimited. See JSON Data Preview and JSON Schema Preview above.
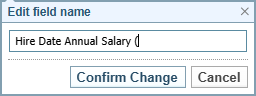
Edit Field Names
To modify the Field Names:
-
Select the Edit button
.Result: The Edit field name dialog is displayed.
-
Change the Field Name as required.
-
Select .