Add (Ingest) Documents
Introduction
Source files are added to Sintelix to be ingested. Files are converted into standardised Documents to be stored in Collections. The content of Documents is then analysed, identifies Text References, Entities and Links.
Many different types of source files can be added: text, images, audio/video, emails, databases, etc.
You can:
-
Add Documents by selecting Collections > Add Documents where you can ingest documents using either:
-
Harvest Documents by selecting the Harvester tab to collect and ingest web pages into Sintelix, including social media.
Key Concepts
It is useful to understand how the Ingestion configurations selected can impact how documents are loaded and ingested.
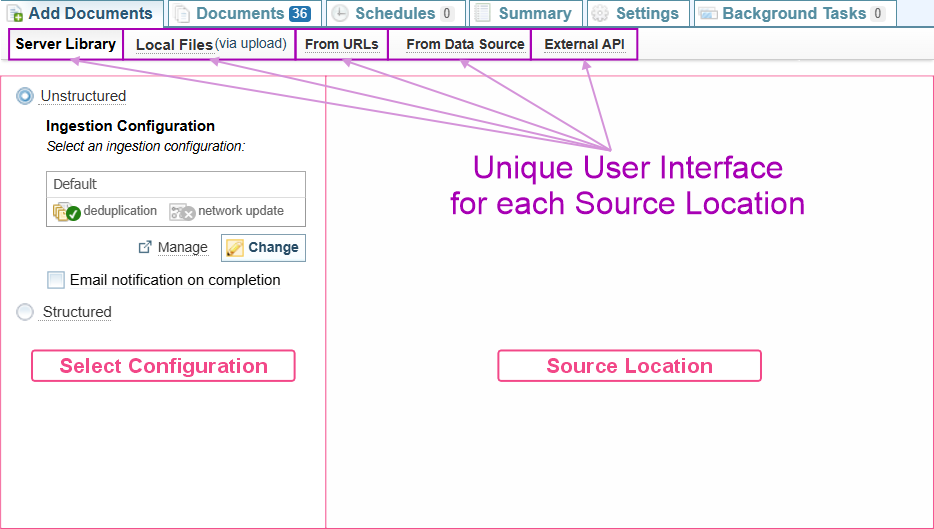
Add Documents tab
When you select the Add Documents tab, Unstructured ingestion with the Server Library source location are selected by default. You can navigate to different source locations by clicking on their name.
Add Documents process
To add documents, you:
-
Select the Source Location.
-
Select the ingestion configuration.
-
Select the files to be added.
On Demand or Scheduled
You can add files any time. You can also use the Ingestion Scheduler to automatically check for new or updated files in a specific library, or new emails from a server, then add them into a Collection. For more information, see Scheduling Ingestion.
File Formats
Sintelix can ingest files in many different formats. Some formats need to be installed and/or configured, including:
-
images/scanned documents by applying Optical Character Recognition (OCR) during the Ingestion configuration.
-
audio/video files by apply Audio-Video Transcription during the Ingestion configuration.
-
web pages from the Internet. See Harvest Documents.
-
forensic data by using the Sintelix Forensic Analysis Tool. See Forensic Analysis.
Other file formats have special features, including:
-
geospatial files which capture geographical data that can be displayed on a map. See Geospatial Files.
Source Location
You can navigate to different source locations by clicking on their name displayed across the top of the Add Documents pane.
You can add source files from the following locations:
|
Locations |
Description |
Unstructured |
Structured |
|---|---|---|---|
| Server Library |
A shared folder location. The Server Library is the fastest and therefore recommended for large volumes of data. |
|
|
| Local Files |
You can upload files from your device. It can be the slowest method to load files. Each file must not exceed 100 MB. |
|
|
| From URLs |
You can provide a list of URLs. Files in the URL locations will be loaded. |
|
|
| AWS S3 Bucket |
The AWS S3 Bucket needs to be configured and may have a different name (see Configure and Secure Libraries). You load files from an AWS S3 Bucket library in the same way as a Server Library. |
|
|
| Mail Server |
Connects to an Email server, if configured (see Configure and Secure Libraries). Requires the user to login to the Mail server to access the emails. As an alternative, emails can be exported as email files and added using one of the above options. |
|
|
| From Data Source |
Connects to a range of data sources, for example a database. See Add from Data Source Connection. A Data Source Connector needs to be configured. See Data Source Connectors (Legacy). Currently only available for unstructured ingestion. As an alternative, data can be exported as a text file (Delimited or Fixed Width) from the Data Source and ingested using Structured Ingestion. |
|
|
| External API |
Using an External API to connect to an external API service such as X (formerly Twitter). |
|
|
The Administrator can add additional libraries, including server library, AWS S3 Bucket library and Mail Server libraries. see Configure and Secure Libraries.
Unstructured or Structured Ingestion
You can choose to ingest files using either:
-
Unstructured file ingestion (default), or
-
Structured file ingestion.
The key differences between the two methods of ingesting data is summarised below:
| Function | Unstructured | Structured |
|---|---|---|
| Ingestion |
The default Ingestion configuration for a Collection is pre-selected. You choose a different Ingestion, if required. |
You choose a Structured Import configuration when adding files. The Structured Import configuration has the Ingestion configuration integrated into the settings. |
| Files |
You can ingest a wide range of files. The files are converted into standardised Documents. The text content of the files is stored in the Content section of the Document.
|
You can ingest Excel, delimited, fixed width, JSON files and Database tables. Each Structured Import configuration is designed for files with a specific schema. That is the files have the same type and number of fields. The most common application would be to import data extracted from software or a database. |
| Entity Extraction |
Entity extraction examines text in the Document Content section to identify text references, entities and links. |
The Structured Import configuration extracts entities and links from the data in the file according to rules defined within the configuration, which are loaded directly into the Network. You do not need to create Documents. If a field contains unstructured data, you can create a Document and save to the field content to the Content section in the Document. Entity extraction is carried out on the Content section of the Document, the same as for Unstructured files. |
Unstructured Ingestion
When you add documents using unstructured ingestion, the default Ingestion configuration for that Collection is pre-selected.
The currently selected Ingestion Configuration is displayed to the left of the ![]() Add Documents pane.
Add Documents pane.
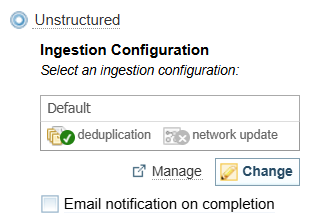
The Ingestion Configuration defines what information is extracted from the documents.
You can change the Ingestion Configuration, if required (but is not recommended).
To add files using unstructured ingestion you:
-
Change the Ingestion Configuration, if required.
-
Select the checkbox if you want to be emailed when the ingestion is completed. This can be useful if adding a large batch of files.
-
Select the files to add from the Source Location. Each source location has a different way of selecting files:
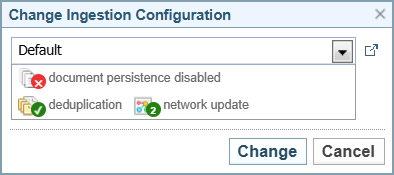
Change the Ingestion Configuration
Changing the Ingestion Configuration will change the default Ingestion configuration for the Collection.
To change the Ingestion Configuration:
-
Select the button
Result: The Change Ingestion Configuration dialog is displayed.
-
Select the required Ingestion Configuration from the dropdown.
Result: See Ingestion Configuration Symbols.
-
Select the button to apply the change.
If you want to view the configuration, select  Manage.
If you have the required permissions, you can edit the Ingestion Configuration. See Ingestion for more information.
Document Creation and Document Persistence
A Document is always created as part of the Sintelix ingestion process.
However, the Ingestion configuration selected can have the Document persistence setting unchecked, which means Documents are deleted once they have been processed and are not saved in the Collection. The information extracted from the Documents is stored in the Network only.
Document Persistence Disabled
When an Ingestion configuration has Document Persistence disabled, the document persistence disabled icon is displayed.

Structured Ingestion
You can try importing sample Structured Import configurations. See Structured Import Example.
To add documents using Structured Ingestion, select the Structured option.

To add documents using structured ingestion you:
-
Select the Structured ingestion option.
-
Change the Structured Load configuration, if required. The Structured Load configuration is designed for files with a specific schema (structure and file type). You need to match the Structured Load configuration to the type of file you are adding.
-
Result: Messages are displayed showing the status of the configuration.
-
Enter a value for the filter, if prompted.
-
Select the checkbox if you want to be emailed when the ingestion is completed. This can be useful if processing a large batch of files.
-
Select the files to add from the Source Location.
Structured Ingestion Messages
Once you have selected a Structured Load configuration, messages are displayed showing the status of the configuration.
The possible messages include:
|
This indicates the configuration settings are incomplete. |
|
This configuration will create documents and a network. |
|
This configuration has filters applied based on a constant value. You can click on the manage button to open the Structured Import configuration to view the filters applied to the data. |
|
This configuration has a filter applied that requires a value to be entered into the table provided. See Prompt for Filter Parameter below. |
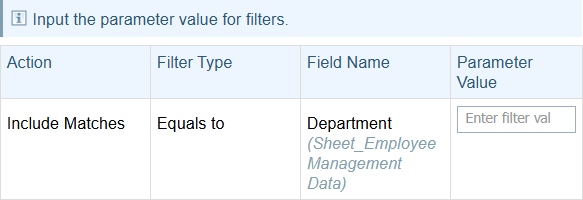
Prompt for Filter Parameter
A Structured Load configuration can include filters that require a parameter value to be entered.
Filters can be set to include or exclude records based on the value entered, checking if the value is Equal to or Not Equal to the value.
In the example below:
-
the container called Sheet_Employee Management Data is being filtered on the Department field.
-
this filter includes records
-
where the value entered in the Parameter Value field equals the value in the Department field in the file(s) being added.
This video demo uses the Structured Import Example:
To view the video in full screen, hover over the video and select the
![]() icon.
icon.